| |
Welcome to Inago Rage
Thank you for playing Inago Rage. This reference manual details both
Inago's gameplay and building aspects. While you're learning about
the game, you might find the following links useful:
System Requirements
To play Inago Rage, you'll need a computer with:
- Windows 2000 or Windows XP
- An 800MHz processor or better
- At least 256MB of system memory (RAM)
- At least 100MB of hard drive space
- An ATI Radeon 7000, Nvidia GeForce2, or better
- Microsoft DirectX
9c or higher
Getting Started
To start the game, double-click the Inago Rage icon on your Windows
desktop or in your Start Menu. Once the game loads, you may wish to
set your preferences in the Game Options menu. To begin playing,
select Play Inago Rage, and Inago will familiarize you with
gameplay. You can create your own levels via the Arena Designer
option in the main menu. |
 Got a suggestion on how we can make Inago Rage better? Let
us know!
Got a suggestion on how we can make Inago Rage better? Let
us know! |
Setting Your Preferences
Before you begin gameplay, you may wish to alter the game's default
options to accommodate your style of play. To do this, select Game
Options from the main menu.
You may adjust the following:
| Game Options |
Sound Volume
|
This controls the volume of
all sound effects. You can turn them off by moving the slider
all the way to the left. |
| Music Volume |
This controls the volume of
all in-game music. You can turn this off by moving the slider
all the way to the left. You can also place your own .OGG files
into Inago Rage's music folder, (by default, this is C:\Program
Files\Inago Rage\Music). |
Mouselook Speed
|
Within the game, moving the
mouse allows you to change your viewing direction. Selecting
a higher mouse speed exaggerates this effect, while selecting
a lower speed means that the mouse will be less sensitive. |
| Invert Mouse Y-Axis |
By default, moving the mouse
up and down within the game will tilt your view up and down,
respectively. When checked, this will be inverted, so that dragging
the mouse down will move the view up, and vice-versa. |
Difficulty
|
This allows you to make the
game easier or harder. The five settings are as follows:
- Easy - Enemies move half as fast and do half as
much damage as normal.
- Moderate (default) - Enemies move at normal speed
and do 100% normal damage.
- Challenging - Enemies move at 150% normal speed
and do 150% normal damage.
- Tough - Enemies move at twice normal speed and
do twice as much damage as normal.
- Extreme - Enemies move at twice normal speed and
do six times as much damage as normal.
|
| Reset Story Mode |
Selecting this option allows
you to play the game's story mode from the beginning. |
Starting a Game
Inago Rage offers a story mode with 50 levels of increasing difficulty.
(You can also create or download levels. For more information on this,
visit the Creating Your Own Arenas
section below.) To begin, select Play Inago Rage from the main
menu. After you read through the story, you're presented with the
level's objectives. Typically, your goal will be to accumulate a certain
number of points before time runs out. When you're ready, click Play
to begin the game.
In the first level, you'll be given a chance to familiarize yourself
with the game's controls. After that, it's you against the world.
Game Controls
You can control your movement via mouse and keyboard. If you play
first-person shooters, you will find the controls to be familiar:
| Mouse and Keyboard
Controls |
| W Key |
Hold this key down to move
forward. |
| A Key |
Hold this key down to sidestep
left. |
| S Key |
Hold this key down to move
backwards. |
| D key |
Hold this key down to sidestep
right. |
| Mouse Movement |
Move the mouse to turn left
and right, and to look up and down. |
| Left Mouse Button |
Fire your primary weapon. |
| CTRL Key |
Fire your secondary weapon. |
| Right Mouse Button or Spacebar |
Hold this down to activate
your rocket boots. After a few seconds, your rocket energy will
deplete. Release the right mouse button or spacebar for a few
seconds to recharge it. |
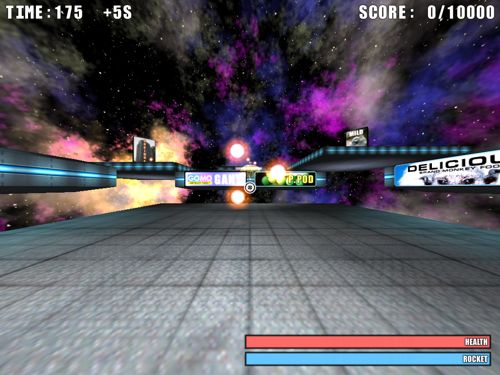
Gameplay Interface
During gameplay, you are presented with the following interface:
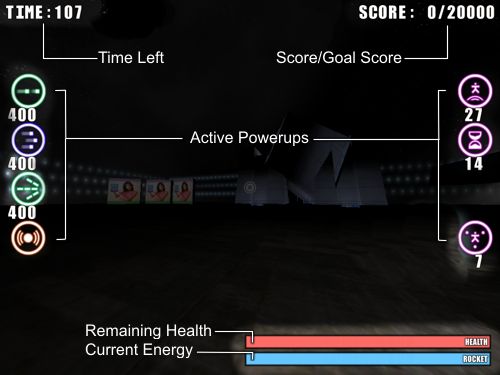
This is described below:
| Interface Legend |
Time Left
|
This is the number of seconds
you have left to complete the current level. If this reaches
zero before you reach the target score, the round ends in defeat.
|
Score/Goal Score
|
This shows your current score
and the number of points you need to win the round. Gain points
by collecting gems and destroying enemies. |
| Remaining Health |
The red bar denotes your current
health level; this decreases whenever you are hit by an enemy
or projectile. If this is depleted, the round ends in defeat. |
Current Energy
|
The blue bar denotes your current
energy level. This is quickly depleted as you boost into the
air (via the spacebar or right mouse button), and quickly replenishes
while you are not boosting. |
Active Powerups
|
These icons indicate which
powerups are currently active. Most such indicators include
a numeric display, denoting how many seconds or charges are
left before the powerup is exhausted. See the Weapons and
Powerups section directly below for more information. |
Weapons and Powerups
You begin a round with a default weapon (with infinite ammo) and the
ability to fly. During the course of the game, different powerups
may appear throughout the arena to augment your abilities:
| Powerup List |

Triplefire
|
You normally fire a single
projectile every quarter-second. Collect the Triplefire powerup,
and you'll fire three side-by-side projectiles instead of one,
making it easier to hit enemies. This lasts for 400 shots. |

Rapidfire
|
When you collect the Rapidfire
powerup, your rate of fire will nearly double. The effect lasts
for 400 shots, and can be active concurrent with the Triplefire. |

Splinter
|
When you collect the Splinter
powerup, each one of your shots will split into three. When
combined with the Triplefire powerup, you'll fire nine times
as many projectiles as normal. This effect lasts for 400 shots. |

Slow Time
|
When collected, time slows
to 75% normal speed, giving you more control over your environment.
While this is active, everything within the arena (including
enemies, projectiles, and you) is slower, as is the countdown
timer. This effect lasts for an objective 20 seconds. |

Boost
|
While the Boost powerup is
active, your rocket boots will thrust you twice as high, often
allowing you to leap over enemies, or reach ledges and powerups
you might not normally have access to. While this powerup is
active, your boots leave twin trails behind you. This lasts
for 30 seconds. |

Guardian
|
When collected, this immediately
deploys three guardian orbs that encircle you. During this time,
and enemies that come into contact with the orbs will be damaged
or destroyed. This lasts 18 seconds; during this time, you can
collect additional Guardian powerups (if any are available)
for even more defense. |

Shield
|
When collected, this immediately
encases you in a protective shield, preventing you from being
damaged. The effect lasts 15 seconds. |

Health |
Collecting this will increase
your health by up to 25%. |

Neutron Bomb
|
This single-shot weapon destroys
everything within a 100m radius. To deploy it, hit the Secondary
Fire button (CTRL). Note: you can only hold one secondary weapon
at once, so if you already have one (such as a Nuke or an Attractor),
make sure to deploy it before collecting a second one. |

Attractor
|
When activated using the Secondary
Fire button (CTRL), this will deploy a stationary attractor
beacon at your location for ten seconds. While this is active,
enemies will chase this instead of you. Note: you can only hold
one secondary weapon at once, so if you already have one (such
as a Nuke or an Attractor), make sure to deploy it before collecting
a second one. |

Lunar Quake |
This one's a secret. |
Enemies
In most levels, you will be pitted against automated drones, which
you may destroy for points. These appear periodically in a surge of
energy. Most can be destroyed in a single shot, but some require multiple
hits. Each enemy is worth 100 points, except where noted.
| A List of All
Known Enemies |
Seeker
|
The most basic enemy type,
Seekers are programmed to swarm you in large numbers. If one
collides with you, it will explode, reducing your health. |
| Seeker Drone |
This variation of the Seeker
glows with a green light, and moves roughly twice as fast. |
| Seeker Mark III |
This glows with a white light
and moves roughly three times as fast as the basic Seeker. |
| Spitfire |
Spitfires are programmed to
glide towards you, periodically firing projectiles. If either
the projectiles or Spitfires, themselves, make contact with
you, they will explode, causing you damage. |
| Spitfire Adept |
The Adept glows red, and moves
50% faster than the basic Spitfire. Its shots move twice as
fast as the Spitfire's. |
| Spitfire Ace |
The Ace glows violet, and moves
twice as fast as the basic Spitfire. Its shots are four times
as fast as the Spitfire's. |
| Kawazu |
The Kawazu is modeled after
its namesake, a Japanese river frog. In Inago Rage, they will
hover still momentarily before making quick "hopping"
motions, usually in your direction. |
| Kawazu Ni |
These glow orange, and jump
roughly twice as frequently as the basic Kawazu. |
| Kawazu San'i |
These glow yellow, and jump
roughly three times as frequently as the basic Kawazu. |
| Spark Fiend |
Spark Fiends hover near their
points of generation, and periodically shoot columns of energy
at you. These columns cause damage upon colliding with you,
but are easy to dodge, as they travel in straight lines. |
| Arc Fiend |
The Arc Fiend glows red, and
shoots faster columns of energy at you. It requires ten hits
to destroy. |
| Chaos Fiend |
The Chaos Fiend periodically
shoots six unaimed columns of energy out in all directions.
Destroying this requires 50 direct hits, and is worth 2,500
points. |
Jellyfish
|
These elegant drones will waft
around the arena, orbiting you for a while before they make
a bee-line straight for your head. If you do not destroy them
within a certain amount of time, they will explode into an expanding
ball of flame. |
| Man-o-War |
This variation of the Jellyfish
moves twice as fast, and requires ten hits to destroy. |
| Medusan |
This variation of the Jellyfish
moves three times as fast, and requires twenty hits to destroy. |
Parade Dragon
|
A collection of individual
drones, the Parade Dragon will twist and turn until colliding
with you. Shooting any of its segments will cause the remaining
segments to pull together into a smaller Dragon. Shooting the
lead segment will, 50% of the time, cause the Dragon to flee. |
| Wyrm |
This green variation of the
Parade Dragon moves 10% faster than the basic model. |
| Ophidian |
This yellow variation of the
Parade Dragon moves 30% faster. |
Pinata
|
The Pinata floats around the
arena, following you around. When destroyed, it will explode
into a handful of violet gems which you can then collect. |
| Angry Pinata |
Unlike its harmless brother,
the Angry Pinata will periodically fire homing shots at you.
These shots will explode when they hit, but can be destroyed
by your weapons fire or by colliding with a wall or building.
The shots also make a "pinging" noise when they're
near you, making them easier to track down. |
| Furious Pinata |
These act like the Angry Pinata,
but their shots are twice as fast, making them difficult to
outrun. |
Crystal
|
The Crystal pulsates with the
energy of five angry glowworms trapped within it. Shooting the
Crystal releases the glowworms, which wriggle around and hunt
you down until they collide with you, or are are shot down. |
| Lattice |
A descendant of the Crystal,
the Lattice moves 50% faster, and its glowworms move twice as
fast as a Crystal's. It requires 12 hits to destroy. |
| Geode |
A final refinement of the Crystal,
the Geode moves twice as fast, and its glowworms move three
times as fast as a Crystal's. It requres 36 hits to destroy. |
Hydra
|
A harmless entity, the indestructible
Hydra begins as a single cube and grows into a four-limbed creature
that spits out bouncing purple gems for you to collect. |
| Tri-Hydra |
This is a three-armed cousin
of the Hydra. It's also harmless, but spits out 25% fewer gems. |
| Mono-Hydra |
This single-armed entity spits
out only a quarter as many gems as the Hydra.. |
Kamikaze
|
These are indestructible cubes
that accelerate towards you. When shot, they'll become opaque
and fly off for a time, only to return later. These are most
dangerous in swarms. |
| Divine Wind |
The green-colored descendants
of the Kamikaze accelerate twice as quickly as the original. |
| Infernal Wind |
The violet-colored descendants
of the Kamikaze accelerate four times as quickly as the original.
They can easily move faster than you do, but are easy to dodge. |
| Miniboss |
This one's also a secret. |
Summary
At the beginning of a round, you are presented with a target score;
to complete a round, reach this target score by shooting enemies and
collecting gems. Each round has a time limit. If this reaches zero,
or your health is depleted, the round will end in defeat. You can
abort a game in progress by pressing ESC. |
|
Got a suggestion on how we can make Inago Rage better? Let
us know! |
Getting Started
In Inago Rage, you can create your own 3D levels in an easy-to-use
editor integrated into the game. To begin, select the Arena Designer
from the main menu.
Arena Selection
At this screen, you can edit an existing arena, modify its file properties,
or create a new one from scratch.
To edit an existing arena, left click on its name. You can scroll
up and down the list by clicking on the Next Page and Previous Page
buttons or by scrolling your mouse wheel.
To rename, delete, or duplicate an existing arena, right-click on
its name and select the appropriate option.
To create a new arena, select Create New from the Arena Selection
screen. Enter the arena's name, then select from one of the arena
bases. The first one is a small, enclosed arena that's good for starters.
The second is a larger arena with invisible walls. The third is a
completely open arena with only a movable platform.
Editor Navigation
Once you have selected an arena to edit, or have created a new arena,
you are shown a bird's eye view of it. You can move this viewpoint
around in the following ways:
| Navigation Reference |
Movement
|
You can move your viewpoint
laterally using controls at the upper-right of the screen. These
are highlighted in orange here:
Clicking on the Forward and Back buttons will pan your view
up and down. Clicking on the Left and Right buttons will pan
your view left and right. You can also hold down the W, A, S,
and D keys to pan up, left, down, and right, respectively. Finally,
you can move your viewpoint via mouse:
To do this, move the mouse pointer over the view and hold the
right mouse button while dragging. |
Rotation
|
Sometimes, you'll want to see
your arena from a different angle. You can rotate your view
90-degrees clockwise with the rotate-left button or counter-clockwise
with the rotate-right button. These are highlighted in orange
below:
You can also press the Q and E keys to rotate left and right,
respectively. |
Zooming
|
You can raise or lower your
viewpoint's distance to the arena floor using the Raise and
Lower buttons :
You can also press R and F, respectively. |
Tilting
|
Your viewpoint is initially
tilted to look straight down at the arena. If you'd like to
get a different view of the level, you can tilt your view up
and down by pressing the Tilt Up and Tilt Down buttons:
You can also press T and G, respectively. |
Note that if you move your view into a piece, (for example, if your
viewpoint is inside a platform), that piece will become invisible
until you move out of it again.
Arena Pieces
An arena starts out as an empty shell, (depending on your choice when
creating the arena, it might be just a background, or an immovable
floor), and can be filled with pieces. Some of these -- like walls
and platforms -- are inert during gameplay. Others -- such as generators
-- create enemies, prizes, or special effects.
Placing a New Piece
To place a new piece in your arena, click on the Place a New Piece
button or press the N key. You're presented with the Item Selector,
where you can select pieces by category.
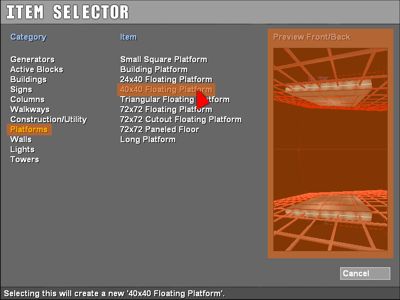
Click on a category on the left, and you'll be shown a list of available
pieces in the center column. In the above image, the category "Platforms"
is selected (highlighted in orange at left), and the mouse is hovering
over a "40x40 Floating Platform" (highlighted in orange
at center); a preview of the piece, from front and back, is also visible
(highlighted in orange at right). After you click on a piece name,
that piece will then appear towards the center of your screen.
Caveat: it's possible that after you create your piece, you won't
see it on the screen. This happens when your viewpoint is within the
newly-created piece, (for example, if you create a skyscraper, and
are close to the ground). To see your piece, simply pan your view
to the side or zoom out.
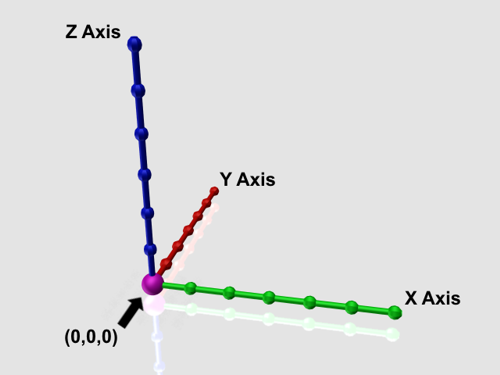
Moving a Piece
You most commonly create an arena by placing, moving, and rotating
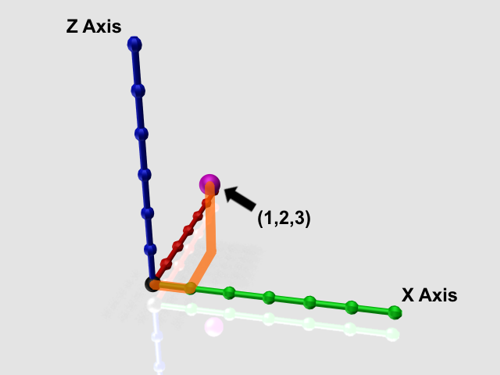
pieces. Each piece has a position within the arena, expressed in coordinates
-- three numbers that denote its lateral position and height with
respect to the arena's center. For example, if a piece is at the exact
center of the arena, it is 0 units "east," 0 units "north,"
and 0 units above the center -- its coordinates will be (0,0,0):
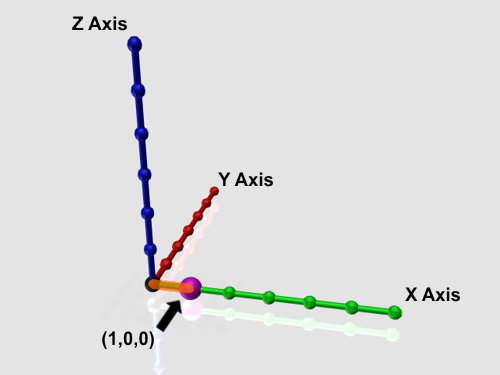
If you then move this one unit east, its coordinates will be (1,0,0):
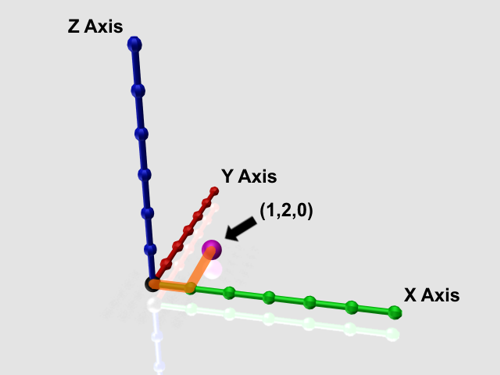
If you then move this two units north, its coordinates will be (1,2,0):
Finally, if you move the piece three units upwards, its coordinates
will be (1,2,3):
Note: You can place pieces with z values less than 0. However, during
the game, if the player falls below z=0, s/he will receive an Out
of Bounds penalty.
You can move and reorient most pieces using the on-screen controls,
the keyboard, or by dragging and dropping:
| Piece Manipulation
Reference |
| Piece Selection |
Before moving a piece using
any of the keyboard shortcuts, you must select it. To do this,
left click on it with the mouse. Its name will appear next to
it. |
Lateral Movement
|
To move a selected piece laterally
(sideways), you can use the Forward, Left, Back, and Right buttons
(highlighted in orange below), or their corresponding I, J,
K, and L keys.
Alternatively, you can left-click a piece and drag it with the
mouse.
|
Vertical Movement
|
To move a selected piece up
and down (changing its vertical position), use the Up and Down
buttons, or by pressing P and semicolon (;) keys respectively.
Alternatively, while holding down the left mouse button down
on a piece, scroll your mouse wheel up and down. |
| Coarse Grid |
If you hold the ALT key down
while you move a piece laterally or vertically, the piece's
position will snap to a coarse grid. |
Turning
|
You can rotate a selected piece
by clicking on the Counterclockwise Rotation and Clockwise Rotation
buttons, or by pressing the U or O, respectively.
To rotate using the mouse, hold down the CTRL key while dragging
a piece to the left and right. |
Tilting
|
You can tilt a selected piece
forward by clicking on the Tilt Forward button or by pressing
the Left Bracket ( [ ) key. Tilt it backwards by clicking on
the Tilt Backwards button or by pressing the Apostrophe ( '
) key.
To tilt using the mouse, left-click and hold the mouse button
down over a piece, and scroll your mouse wheel while holding
down the CTRL key. |
Dropping
|
You can "drop" a selected piece
by clicking the Drop to Ground button or by pressing the Period
( . ) key. What the editor does in this instance is to draw
an imaginary line from the piece's origin downwards; the piece
will be moved to wherever this line intersects the ground, or
another piece. If no intersection occurs, the piece's location
remains unchanged. |
Deletion
|
Remove a selected piece entirely
by clicking on the Delete Piece button or by pressing the DEL
key. |
Generators and Special Pieces
There are three types of generator in Inago Rage: Prize Generators,
Enemy Generators, and Particle Generators. Prize Generators
periodically spit out gems and powerups; Enemy Generators periodically
spit out enemies; and Particle Generators spit out special effects
such as flame or smoke. These are available from the Piece Catalog
under the category Generators.
Prize Generators
In the game, these will periodically create collectible powerups according
to your specifications; these will be generated at the prize generator's
location. Shown below is a selected prize generator (the green box)
and the editable parameters (highlighted in orange):
Once you've selected a Prize Generator by clicking on it, you can
set the following parameters:
| Prize Generator
Attributes |
Type
|
This determines which powerup
or prize to generate. By default, a prize generator will create
1,000 point gems, but you can change this by clicking on the
arrows to either side. |
| Delay |
This is the number of seconds
the prize generator will wait before creating its first prize.
Hold down SHIFT while changing this to increase or decrease
this figure in 10 second increments. If this is set to 0, a
prize will be generated at the beginning of a round. |
| Period |
This is the number of seconds
the prize generator will wait between successive prize generations.
For example, if this is set to 100, a prize will be generated
every 100 seconds. If this is set to 0 (off), only one prize
will be generated. |
Here are some examples to demonstrate how the Prize Generator works:
| To get this effect... |
Specify this prize type... |
And this delay... |
And this period... |
Generate a Triplefire every
10 seconds.
|
Triplefire |
0 Seconds |
10 Seconds |
| Wait 25 seconds, then generate
a Rapidfire every 30 seconds. |
Rapidfire |
25 Seconds |
30 Seconds |
| Generate a single Attractor
at the beginning of the round. |
Attractor |
0 Seconds |
0 Seconds |
| Wait a minute, then generate
a single Neutron Bomb. |
Neutron Bomb |
60 Seconds |
0 Seconds |
Note that you will only be able to see the green Prize Generator boxes
in the Arena Designer. While in play, these will be invisible.
Enemy Generators
These work the same way prize generators do, except that they generate
one or more enemies. To place one in the arena, select Place a
New Piece, then select the Generators category, then select
Enemy Generator. By default, when you begin the round, the
generator will generate a single Seeker at its location.
Once you've selected an Enemy Generator by clicking on it, you can
set the following parameters:
| Enemy Generator
Attributes |
Type
|
This determines which enemy
will be generated. (For more information on what enemies are
available, see the Enemies section, above.) |
| Delay |
This is the number of seconds
the generator will wait before creating its first enemy. |
| Period |
This is the number of seconds
the generator will wait between successive enemy generations.
If this is set to zero (off), the generator will only spawn
enemies for one cycle. |
| Charges |
This is the number of times
the generator will create enemies before becoming inert. If
set to zero (off), no limit is imposed unless the Period is
also set to zero. |
| Quantity |
This is the number of enemies
that will be generated each cycle. This can be set to 1, 3,
9, or 27. (All powers of 3!) |
| Limit |
For any given cycle, a generator
will only generate enemies if there are fewer than this number
of enemies already in the arena. If set to zero (off), this
defaults to the game's maximum, which is 200. Note that if a
generator skips a cycle due to this limit, it will not count
against its number of charges (see above). Note that this parameter
does not take into account enemies that are currently being
generated. |
Here are some examples to demonstrate how the Enemy Generator works:
| To get this effect... |
Specify this enemy type... |
This delay... |
This period... |
These charges... |
This quantity... |
And this limit... |
Generate a single Seeker.
|
Seeker |
0 |
0 |
0 |
1 |
0 |
| Generate nine spitfires every
10 seconds. |
Spitfire |
0 |
10 Seconds |
0 |
9 |
0 |
| Wait 60 seconds, and generate
27 Kawazu Ni. |
Kawazu Ni |
60 Seconds |
0 |
0 |
27 |
0 |
| Every 5 seconds, check to see
if there are fewer than 10 enemies in the arena. If so, generate
a Pinata. |
Pinata |
0 |
5 Seconds |
0 |
1 |
10 |
| Wait 25 seconds, then generate
a Kamikaze every 3 seconds. Stop generating after the 15th Kamikaze. |
Kamikaze |
25 Seconds |
3 Seconds |
15 |
1 |
0 |
| Spam the player with piles
of Seeker Drones. (Note that even though no limit is selected
here, there's a hard limit of 200 enemies onscreen at once.) |
Seeker Drone |
0 |
2 Seconds |
0 |
27 |
0 |
Note that you will only be able to see the orange Enemy Generator
boxes in the Arena Designer. While in play, these will be invisible.
Particle Generators
These periodically generate blobs of light or smoke, and can be used
to create special effects. To create one, select Place a New Piece,
select the Generators category, and click on Particle Generator.
By default, you'll see a red arrow that periodically spits out fireworks.
You can change the arrow's direction (see Moving
a Piece above for details) to spit particles out in different
directions. Below, you can see three Particle Generators in different
orientations:
You can set its parameters as with the Prize and Enemy generators:
| Particle Generator
Attributes |
Type
|
This determines the type of
particle to create. Shown below, from left to right, are Fireworks,
Flame, Rising Beam, Steam, Sparks, Blue Beam, and Glass Shards:
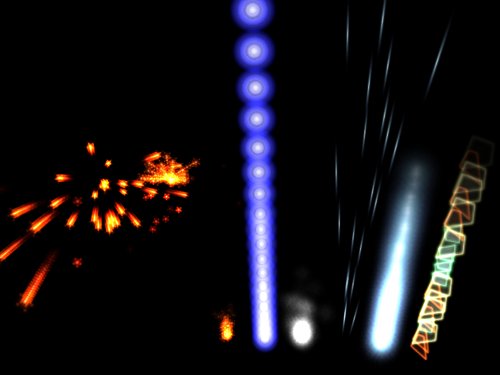
|
| Delay |
The number of seconds the generator
will lie dormant before spitting out particles. |
| Period |
The amount of time the generator
will wait between particles. Most commonly, the larger this
number, the sparser an effect will be. For example, in the below
image, the top generator is set to spit out particles without
delay (a period of 0), while the bottom generator is set to
spit particles out every 4/10ths of a second (a period of 4).
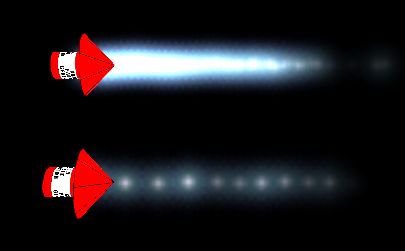
|
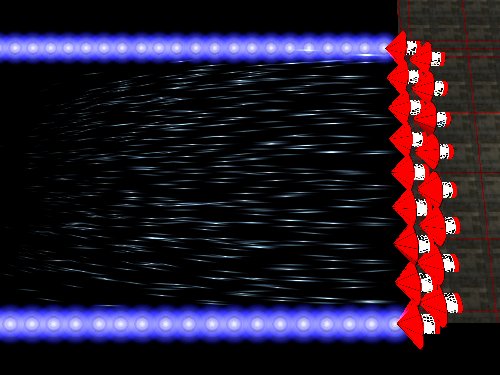
Often, multiple particle generators (shown in red in the editor, but
invisible during play) are used together to create new effects:
Active Blocks
In addition to the above generators, you'll find the following pieces
in the Active Blocks category. (Select Place a New Piece,
then click on Active Blocks at the left.)
| Synopsis of
Active Blocks |
Player Start Location
|
Place this in your arena to
determine where the player will start. If no such piece is in
your arena, the player will start at coordinates 0,0,0. This
piece will be invisible during gameplay. Note: If you created
an arena using an "arena base" without a floor, you
must make sure to place your player start location above z=0.
During gameplay, if the player falls below the z=0 plane, s/he
will be given the "Out of Bounds" notice and placed
back at the start location. |
| Wind Blower |
When placed in your arena,
this will cause the player to be constantly pushed by wind.
The Wind Blower is shown in the Arena Designer as an arrow;
the direction of the arrow determines the direction of the wind.
This piece will be invisible during gameplay. |
| Accelerator |
These are like conveyor belts;
when a player steps on one, the Accelerator will propel him/her
in the direction of the arrows. |
| Small/Large Bouncer |
When stepped on, a Bouncer
will propel the player upwards like a trampoline. |
Arena Options
You can modify an arena's global parameters by clicking the Arena
Options button at the lower-right of the Arena Designer screen.
The following items are available for editing:
| Arena Options
Listing |
| Gravity |
This determines the downward
pull on the player during the game. The three settings are Low
(Luna gravity, about one sixth that of Earth's), Medium (Earth
gravity), and High (Jovian gravity, which at its equatorial
surface is a bit higher than twice Earth's). The default is
Medium. |
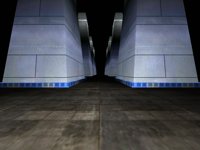
Jumpsuit Lit
|
When selected, players will
illuminate the architecture around them.
 |
Jumpsuit is lit (default). |
 |
Jumpsuit is unlit (only self-illuminating objects can
be seen). |
|
| Fog Thickness |
The amount of colored fog visible
in the arena. By default, this is off, but can be set to Light
or Heavy fog.
 |
Fog is off. |
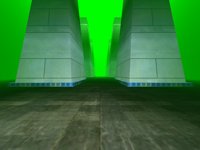 |
Fog set to "light." (See below for color.) |
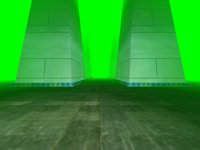 |
Fog set to "heavy." (See below for color.)
|
|
| Fog Color |
These three bars determine
the "redness," "greenness," and "blueness"
of any fog present in a level. This uses an additive system
rather than a subtractive system -- if you're familiar with
how RGB is specified in web pages, (or on computers in general),
this works the same way. So, mixing green and red (by sliding
the green and red bars to the right) will give you yellow.
 |
Lots of green, some red, and no blue will give you an
orange fog. |
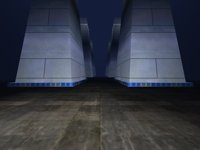 |
A tiny amount of blue will give you a dark blue fog. |
|
A lot of green, no red, and no blue will give you a
pure green fog. |
|
| Ambient Light |
This slider determines how
brightly the entire arena is lit. Note that this only affects
objects that are not, themselves, illuminated. So, for example,
dark buildings are affected by this setting, but bright signs
are not.
 |
By default, the level will be lit with no ambient light.
During play, only objects that illuminate themselves,
and areas near the player are visible. |
 |
If you move the slider halfway up, the entire arena
will be partially lit. |
 |
Moving the slider all the way up will illuminate the
arena fully. |
|
| Background/Skycube |
On levels without walls or
fog, this determines what the sky and distant ground will look
like.

|
| Time Limit |
This is the number of seconds
the player has to finish the level. |
| Target Score |
This is the number of points
a player must accumulate before time runs out, in order to win
the level. |
Playing Your Arena
At any time during the building process, you can click the Play
Arena button at the lower-right of the screen. Your arena will
then be saved to disk, and you can try it out immediately. When you're
done, you can press the Esc key to exit back to the arena designer.
Drawing and Framerate
By filling your arena with too much activity, it's possible to slow
your computer down to the point where the game is unplayable. How
much activity depends on your processor speed, video card, and memory.
Here are some things to avoid:
| Things to Avoid |
Too many pieces
|
Your computer is required to
draw each piece thousands of times a minute. If there are too
many pieces being drawn simultaneously, you'll notice that the
game slows down in an attempt to catch up. The same is true
if there are too many particles on the screen at once. Your
system will struggle to draw them all. |
| Too many different pieces |
An arena containing 100 pieces,
each of a different type, will result in slower gameplay than
an arena containing 100 of the same type of piece. |
| Too many enemies |
As with inert pieces, enemies
take time to draw; if your computer has to draw many, then each
frame will take longer to draw, dragging the framerate down.
But enemies also react to the player and move around the arena
-- calculating this also takes time. All things being equal,
it takes more work for your system to position and draw 100
enemies than it does to draw 100 inert platforms. Also, it should
be noted that the more visually complex an enemy is, the longer
it takes to draw -- an arena with 100 Pinatas visible will run
much slower than an arena with 100 Seekers. |
|
You can trade your arenas with other fans of Inago Rage by e-mailing
them the "compact arena definitions." To send someone an
arena file, locate it by title in your Inago Rage maps folder. By
default, this is C:\Program Files\Inago Rage\maps, (though
the exact location depends on where you installed Inago Rage). Your
entire arena is included in the single .cad file. If you have downloaded
an arena file, (e.g., from our website), you can install it by copying
the .cad file to your Inago Rage maps folder. (Again, by default,
this is C:\Program Files\Inago Rage\maps.) The arena will appear
within your arena list the next time you start the game.
At the time of this writing, nobody has created any new arenas, because
the game hasn't been released yet. However, once they do, we hope
to put these online in the Player
Extras section of the Inago Rage website. |
In the past, we've used player feedback to make our games better.
We hope to do the same with Inago Rage. If you think there's something
we could describe better in the manual, let
us know so that we can improve it. If you think there's a feature
that should exist in the game, let
us know. If there's something you absolutely love about the game,
tell
us!
And if you enjoy playing Inago Rage? Spread the word! |
Inago Rage was written by Ichiro Lambe. That's me. I'd like to acknowledge
the following people for their help over the course of this project:
| Dan Brainerd |
Story Concept/Photo Direction/Beta Testing/As
Angelo Sen/500 Other Things |
| Susan Lambe |
Vocals/Voiceovers/As Ise "Inago"
Asahi |
| Chris Vance |
Beta Testing/As Ephram Spin |
| Mark Booker |
Voiceovers/As Jerem Smith |
| Arthur Lew |
B-Unit Camera/As Henri Dumont |
| Mimi Balaji |
As Meenakshi "Meena" Narayan |
| Margot Tracy |
As Ellie Whitney |
| Kent Mori Walther |
As Ryon Asahi |
| Anne Coleman |
As Daisy Leigh |
| Nathan Reed |
As Dawrin Spin |
| Elham Ghaem-Maghami |
As "Europa" |
| Vinod Tilak |
As Malcolm "Muskrat" Chandra |
| Stephen Lee |
As Liu-Jin and Liu-Jun |
| Sarah Kleinman |
As Patricia Lane |
| Natalie Balaji |
As Alina Narayan |
| James O'Donnell |
Additional Artwork |
| Glenn Tester |
Additional Artwork |
| Ben Casper |
Beta Testing |
| Sam Clemens |
As Mark Twain |
Special thanks to C. Corey Fisk for her creative mind and her editorial
eye, to Nastaran Baradaran for her support, and to the folks at Conitec
Datasystems for developing a great 3D engine. I'd also like to thank
Dan Brainerd again, because you really can't thank a man enough for
staying up all hours of the night, testing your game. |
|